Computers are an essential activist tool for creative ideas and communications. Used to access the Internet, they allow fairly unfettered access to the planet. Used to edit audio, images and video and broadcast the result to the planet, they have become the new printing press...actually they can assist in printing too. They are both ubiquitous, and commodity items and their miniaturization may eventually doom them to the scrap heap of history.
But for now they are still bloody useful tools. And they are so simple to build...which is what this article is about.
A little personal history: In 1976, I started playing around with mainframe programming in a FORTRAN programming class in college on the mainframe computer. I found a very crude but at the time state of the art word processor on the mainframe that had the most incredible option ever invented . . . a spell checker! I was hooked.
There were personal computers (PC) around then--I saw my first Apple II in 1979 ($16,000)--but saw no great use for one at the time for myself which after all is what a "personal" computer is for. Fast forward to 1981, IBM in a panic that their main competitor Xerox would soon release a PC to the public creates its own competing product in nine months flat! Due to time constrains imposed upon the engineers they are forced to do something IBM
never did, use open standards to develop the PC since they do not have time to create proprietary standards. Little did the IBM engineers responsible realize they were creating a watershed event and sealing IBM's doom.
In August of 1981, IBM releases their first PC1 to a fairly yawning world. But using open standard components unlike their competitors allows both IBM PC clones to be developed by other manufacturers who add their own inventiveness to encourage buying o their PCs but also allows third parties to develop plug in modules (expansion cards and
all PC parts ) of each PC component that will work (usually) interchangeably in all IBM compatible PCs. This open standardization has fortunately continued to this day to the point where Apple now uses PC compatible parts and proprietary hardware has virtually disappeared. Plus incompatibility issues are now fairly rare and usually soon corrected.
In late 1983, I see my first IBM compatible PC, a DEC (Digital Equipment Corp.) Rainbow 100 that came with a wood accented "desktop" case and two full height actual floppy drives capable of storing a massive 360 kilobytes of data apiece. You booted up using a floppy containing the Microsoft DOS operating system (OS) in the A: drive which would load itself into and run as best it could in the PC's memory. You removed the OS disk if needed and ran a program application disk in the A: drive. You could save data to the other drive. If the operating system found it needed to load another part of itself into memory to continue running the app it would send notice that the operating system disk needed to be temporarily placed back in the A: drive. Fun times.
But what an app! I saw my first personal computer word processor, Wordstar, that was far superior to any mainframe word processor I was using and it had my favorite option: a spell checker. Suddenly I had a desire to get a PC for myself.
In 1984, my major professor in whose PC was installed a proud new acquisition: A massive--for the time--5Mb Seagate full height marvel of a hard drive. He let me watch its installation. When he opened up this mysterious PC case I realized two things that still hold true today.
One, a PC is made up mostly of air. That is correct. The case was mostly empty---in part this allows heat to dissipate away from the electronics. It also allows plenty of room for adding things.
Secondly the PC is made up of only a few plug in parts. Now a days nine components (see list below) to be exact, with one or more optional additions. 'Why, anyone could assemble this.'
In 1984, the
entry level price for a PC was $5,000! I sure didn't have that kind of money. But how expensive were the parts I wondered?
I found a magazine,
Computer Shopper, a massive monthly postman crippling 800 page thick 11" x 17" tabloid that was little more than an advertising catalog in the days before you could go online. In the very back were the cheap ads from Asian immigrants who set up west coast and east coast businesses and imported PC parts from Taiwan. Looking for the cheapest stuff I could find, I was able to assemble a PC including a monochrome monitor and a keyboard (what is a mouse?) for around $800. If I had any brains--which I didn't--I would have started manufacturing the darned things which would have easily paid for my graduate education.
So, building your own PC can save you money?
Back then it could. Now a days you can buy a discontinued or refurbished PC from an outlet store for $300 that includes a monitor, mouse, speakers, keyboard, 90 day or even occasionally a 1 year warranty and a Windows 7 operating system for $300. $500 can get you a new PC. You can't compete with that buying parts! Additionally both low cost laptops and high priced smartphones are greatly eating away at desktop PC sales. So why would you want to build your own PC?
In these times of failing economic times being able to repair and upgrade your own PC makes sense. Paying someone nearly the cost of your old PC to repair it makes no sense at all. The best way to learn is to design and build your own. It will fill you with confidence that you know what is inside your PC. And in the coming days repairing and upgrading your own PC is a good skill set to have.
Also you can assemble your PC from parts you want rather than what someone selected for you. There is a reason the big box boys like Dell, HP, Gateway and Lenovo can sell a PC so cheap. One, they buy in volume, guaranteeing parts manufacturers of purchases in lots of 10,000 or more. That merits a serious discount.
Secondly they buy cheap, dare we say substandard parts that just get by the warranty period. Like their power supplies.
For the average user-- and that is well over 90 percent of you--you don't play powerful 3D games and you don't render long videos. A simple desktop model will serve you for many years. In my opinion, such a PC should be replaced every seven years due to technology improvements, but I still see people happy chugging along on eleven or twelve year old fossil PCs. You don't need much computing power to surf the web, watch videos , send emails or write documents. The very good news is that modern components are very powerful without buying the latest and greatest parts. They are also very reliable if you are willing to spend a little more money.
ATX is two standards. One applies to power supplies and currently is designated by ATX12V while the other is the ATX standard for the motherboard (and computer case). There is an micro-ATX or u-ATX standard for motherboards (and case) which is the same except the motherboard (and case) is shortened to four expansion slots maximum over ATX's seven. There is a smaller motherboard standard called mini-ITX that is ATX compatible in that it's single expansion slot, four mounting holes and read I/O ports line up and are therefor compatible with the ATX standard.


So what are the nine parts needed to build my box? 1. Computer Case (ATX; ATX motherboards are too big to fit micro-ATX or mini-ITX cases, but the smaller motherboards will fit in the bigger standard cases) Many cases are now tool-less. They will hold parts in place without screws. Few are completely screw less but tool free is pretty convenient. A case can be functional or a statement of the owner. It can allow hard drives to be instantly swapped out. It can have a myriad of interface ports...or these peripherals interfaces can be later added to one of the cases' drive bays. It can have a carrying handle. Modifications and art work to be found are endless. Just make sure the motherboard you buy will fit the case.
The case is usually designed to direct air and shed heat. It pulls in cool air from low and typically the front of the case, past the hard drives then any video card finally rising up past the motherboard circuitry to the CPU and then being exhausted through the upper back of the case through a case fan and/or PSU.
2. Power Supply (ATX12V revision 2.x or EPS standard, both are mutually compatible and indeed merging) Width and height are standard as is spacing of the four mounting screw holes.. Length (depth) [jutting into the case] can vary from 140mm to 230mm. Spend the money and buy a good one with at least 400W. Unless you plan on adding a powerful GPU (video) card, 400W is plenty. Quality creates less problems down the line and can be reused in a future system. I usually recommend a 80Plus qualified power supply which means at least 80% of its power is going into the PC and only 20% or less is waste heat. They are always built of better stuff.
Some power supplies are "modular" meaning their individual cables plug in. This can reduce cable clutter inside the case with unneeded cables left off, but can allow a cable to come loose if the PC gets transported or moved. There will be a number of power connectors including a motherboard connector, an extra four and/or eight pin CPU power connector to plug into the motherboard near the CPU, possibly one or more six and/or eight pin expansion card auxiliary power connectors (PCI-E), SATA power connectors, Molex (4-pin) connectors (for old drives and fans) and maybe even an old tiny Berg (4-pin) connector for the vanished floppy drive. A good quality PSU should have a manual available on its manufacturer's tech support web site. Expect to spend $45 (on sale) to $80 for a good one.
3. A shiny I/O (input/output) port back plate that will come with the motherboard if you buy a retail box.
[Usually the retail box version includes one or more SATA cables (you will need two), motherboard installation drivers and motherboard manual on a CD.] This I/O plate will be pushed into the back of the case. While not very professional looking you can run without this plate in the case. Will potentially allow RFI (radio frequency interference) to leak out of the computer case interfering with other electronic devices.

I prefer to assemble the above three items first. Open the cover on the case (read case instructions). Put the rear I/O (input/output) ports back plate (back panel) in first. Be careful not to cut yourself on the sharp tabs. Then put the power supply (PSU) in using four screws to secure on the back of the case. There are now only two thread types of screws used in a PC (three if you count the ones used to secure case fans whose huge threads are made to grip into the fan's plastic). The same thumbscrews that will seal a case shut can be bought and used to fasten the PSU as well as to secure expansion cards and hard drives, precluding the need for a #1 Phillips screwdriver.
--------------------
4. Motherboard (must support CPU and memory type) - has many functions embedded upon it.
Those early PCs had to have a lot of expansion cards added to them to add functions to the PC. Most of these functions have blessedly now moved onto the motherboard which reduces overall cost and actually increased the speed of the functions in many cases. Current things to look for: Make sure the motherboard supports the CPU you are buying. Every motherboard manufacturer's tech support site contains a "CPU support list" for each motherboard. If the CPU is not on the list it is not going to run. USB3 is the new standard and it seems to be as popular as the ubiquitous USB2. Look for it present on the motherboard. Look for onboard video graphics if you do not need a video card. A recent twist...Intel has embedded video graphics onto its Core i3 and i5 CPU line. Most compatible motherboards will support this but maybe labeled no onboard graphics when in fact it is onboard graphic just supplied by the CPU instead. AMD has done the same with its latest socket FM1 motherboard/CPU (they are calling this an APU) line. SATA3 (aka SATA 6Gb/s) support is also a nice option if you want to install a SSD (see below) drive. I like motherboards to have four memory slots (or more) and the ability to support at least 16 gigabytes (GB) of memory (RAM...DDR3 in this case) for future RAM expansion. Motherboards should come with at least one Gigabit speed Ethernet port, I rather like smaller micro-ATX motherboards and cases for the size as I rarely use any of the four expansion slots, the onboard sound is as good if not superior to all but the $200 area of sound cards.
Before buying it is a good idea to visit the motherboard manufacturer's support site and see how well their online support is or their motherboards and specifically your motherboard. [The standard of motherboard support is found on ASUS, Gigabyte and Intel motherboard tech support sites.] By downloading and reading the manual before purchase you can not only find out what parts are recommended for the motherboard but whether the motherboard is capable of doing what you want it to do for many years to come.
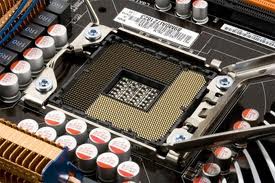
This is important because Intel motherboards come in several socket designations. Intel's CPUs are socket specific. So they will only work on one socket type. In this case "socket 1155" is the most contemporary for the typical user. Only socket 1155 CPUs will work in socket 1155 motherboards. And even then not all socket 1155 CPUs will work---hence the CPU support list.
AMD makes their sockets backward compatible with older CPUs for the most part (the new socket M1 is an exception). But even they have their CPU support list. AMD's current sockets are called AM3+ (plus) and FM1.
5. CPU (Intel or AMD) - multiple cores, 64-bit Intel and AMD CPUs are not compatible.
You choose one or the other and the motherboard to go with it. Frankly a dual core CPU is still plenty for most uses and a triple core a bit of insurance for applications that can take advantage of them in a year or so. But for the most part it looks like both manufacturers are going towards four cores as their standard bearer.
AMD has two primary models for their AM3/AM3+ socket; the Athlon II and the Phenom II. The primary difference is the Phenom II has a third level onboard memory cache (L3) added. There is a performance gain, but not much of one for most uses. If the price is significant don't be afraid to go with the Athlon II. The latest AM3+ CPUs (the Zambezi group) have been a huge performance disappointment. Faring really no better than their older Phenom II counterparts. I have a hard time recommending spending the money despite my love of AMD.
Intel on the other hand continues to kick butt with its CPU releases, and their CPUs at matched prices with their AMD counterparts are probably offering more performance for the dollar. I pretty much recommend them now unless their is something AMD offers that Intel doesn't that you want or you get a good deal.
Such is potentially the case with AMD's FM1 socket offerings. You get the best onboard video graphics offered in a CPU or motherboard beating out the Intel i5 by a fair bit. It also has native support for SATA 6Gb/s and USB3 built into the CPU while Intel and the rest of AMD's line still uses off board third party manufacturers to supply the support chips on the motherboard. This should result in greater throughput (speed). They call these CPUs APUs. Either way they seem very good for corporate and frankly most users over a long period of use. But I still find them pricy when all parts are added together. Plus unlike other CPUs that pretty much can use almost any speed of DDR3 RAM without a performance hit (or gain), the APUs are optimized for more expensive DDR3 RAM running at 1,833MHz speeds.
6. Heat sink/fan (HSF) - thermal paste, cools the CPU, fan speed usually controlled by motherboard/CPU thermistor if fan is plugged into the appropriate spot on the motherboard. Usually the HSF comes with the CPU if you order the retail box and not the naked OEM (original equipment of manufacturer) version which will only save you maybe $10 and does not have a three year warranty on the CPU like the retail box version does. A third party heat sink/fan will cost you more than that. There will be a gray coating on the bottom of the heat sink. This is a waxy thermal paste. Don't disturb it. It will melt and seal any air pockets between the heat sink and CPU surface to promote uniform cooling. It is very necessary. If you ever remove the heat sink you
must remove the thermal paste using just water or 70% alcohol and apply new paste per directions. I currently recommend
Arctic Silver's Ceramique 2 because it is cheap and does the job well.
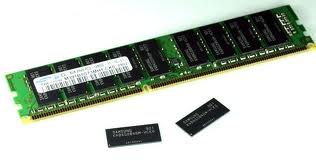
7. Memory (RAM) - currently DDR3
Currently sticks of RAM are pretty much all DDR3. DDR4 is being made in limited quantities and will come out soon but motherboard nor CPU that support this new specification have not been released. DDR2 is still readily abundant and available for upgrading old PCs. RAM is dirt cheap right now. Dirt cheap. Virtually all RAM carries a lifetime warranty.
I usually assemble the motherboard, CPU, HSF and RAM
outside the case on a towel folded four layers thick or on corrugated cardboard (you can use the box the motherboard came in) surface. This prevents scratching from the solder points on the bottom of the motherboard, damage to the solder points, is a non-conductive surface and provides a bit of cushion.
Motherboards are secured to the case on "standoffs which are usually brass parts that screw into the case by hand. Match each hole in the motherboard to a standoff. Once you have all of them screwed into the case, put the motherboard on a nonconducting surface. You should have read the motherboard manual. It is quite informative. Pull the (zero insertion force) lever found on side of the CPU socket strait up. There are markings on the CPU (consult both motherboard and CPU manuals) and motherboard socket that help to align the CPU with the socket. There is only one correct orientation out of four possibilities. The CPU should easily and readily drop in and seat without any effort (hence the term zero insertion force socket). If it doesn't something is wrong back off and reread directions and try again. Bending a pin or motherboard pin voids the warranty and may doom the CPU. AMD CPUs use pins to mate to the socket while Intel sockets contact pins on the motherboard socket. Once seated lower the ZIF lever back in place and secure under the supplied tab.
Usually inserting the RAM sticks are more easily done at this time. In a four slot arrangement there are two pairs of slots usually designated channel A and channel B (or 1 and 2 or zero and one just to confuse). You want to put a pair of DDR3 RAM sticks into the A channel. This will run them in dual channel mode for a slight performance gain. Usually the matched slots are color coded. Consult motherboard manual. The way you install any modern RAM stick is to open up the attaching tabs and orient the stick so the gap(s) in the contacts matches the insert in the RAM stick slot on the motherboard. These are there to prevent either the wrong RAM type being inserted or inserting in the wrong orientation. Load the stick in and then using your two thumbs push strait down. The two tabs on the sides should snap in securing the stick. Don't force it. If it resists back off check for orientation and correct RAM type (DDR3) before retrying. It does take some force.
If you have two empty slots this is for a future upgrade. RAM upgrades can deliver the biggest bang for the buck.
Now put the HSF onto the CPU. Usually it can be put on in any of the four orientations. I like to consider where it will plug in to help determine the orientation. Additionally if the fan stands up orientation should consider directing the exhaust air towards the back of the case to shed heat. For AMD HSF's they screw into the motherboard at all four corners. Do not tighten them greatly a light snug fit does the trick (read the CPU manual). Intel uses a push pin arrangement. Push hard on two catercorner puns to seat them and then repeat on the other two pins. The motherboard will bow up some which is normal if disturbing. It is designed to do that. There should be no movement on the HSF once mounted or it is not secure and the CPU will rapidly overheat and shut down. Plug the HSF into the CPU fan power lead on the motherboard. Make sure the cord will not get caught in the fan.
Now you can either install the drives into the case first (probably wise) or the motherboard. I will give instructions for the motherboard now.
Try not to grasp the heat sink to support the motherboard---resist the temptation. Grasp the motherboard by the edges and lower it carefully down into the case do that the I/O ports line up, all of the I/O panels tabs are on the outside (making an electrical grounding contact---DO NOT ALLOW grounding tabs to be touching inside any ports or you will short out your system (very bad). Try not to scratch the bottom of the motherboard against the standoffs. Align the motherboard holes over the standoffs. [I should say here that in really crowded cases you may have to install the motherboard then the power supply. If so try not to smack the HSF with the mass of the PSU.]
Then find finely threaded screws called M3 (which also secure defunct floppy drives and optical drives) and secure each motherboard hole to its standoff using a Phillips #1 or a nut driver or if you are lucky M3 thumbscrews. Just snug them, brass is soft and can strip.
---------------------
Essentially if you have an old PC you can upgrade your PC with a MB+CPU+RAM swap for an incredible performance upgrade. Caveats are if you have older IDE (aka ATA-5 or ATA-6 or EIDE or ATAPI) drives you will need a motherboard with an IDE controller to reuse them. None support more than two drives and many modern motherboards no longer have an onboard IDE controller. An IDE controller expansion card can be bought cheaply but for the same price as a new SATA DVD burner. Secondly, if you have a big box manufacturer PC, replacing the motherboard will void your operating system (OS). Actually any swapping of the motherboard voids all but retail or upgrade versions of Windows operating systems. But there is a repair provision in Microsoft's EULA that allows a one time motherboard replacement IF you have a defective motherboard. Just saying.... Also it is frequently a good decision and time to replace a cheap PSU. But a CPU+MB+DDR3+OS+PSU replacement now adds up.
-----------------
8. Hard Drive (SATA interface), SSD, reuse old drive (IDE)
Up until recently hard dries were dirt cheap. A great way to speed up an old PC. No more. Flooding in Thailand wiped out some manufacturing and tripled the prices. At one point I could buy a high quality Hitachi 1.5 Tb (terabyte) hard disk drive (HDD) for $50! No more. There are really only two hard drive makers left, Western Digital and Seagate. Toshiba still makes drives for its own use, but the remainder have been bought up by the remaining two fish. Worse both manufacturers have dropped their warranties down to two years now as quality control appears to be slipping.
Solid state drives (SSD) are now available. Previously expensive now they are comparably priced to overpriced hard drives though still of fairly small of size at a price point most would accept. No moving parts. Silent. Low power. Cool running. Very fast. Five year warranties. When they fail they usually fail read only---that is data can be accessed just not written to. Increasingly tempting.
9. Optical Drive (DVD burner) - burns CD-Rs too. Can have BluRay read/write option as well. (reuse old drive) Everyone should have at least a DVD burner. They run $30. If you have an old one, an IDE interface you can reuse it. They are no slower than their newer SATA counterparts. A CD records about 700Mb. A DVD five times more. Dual (double) layer twice as much. And BluRay holds five times as much as a DVD---but it is fairly slow to write that much data, nearing half an hour to fill the disk. But a BluRay reader may have uses for anyone interested in watching high def movies.
Both drives screw into drive bays. Or lock into in tool-less cases.
Connect the data cables from each drive to the motherboard. Connect the power supply to the motherboard, to the CPU auxiliary power connector on the motherboard, to the drives. Connect the front panel connectors to the headers (connectors) on the motherboard per its manual's instructions. Connect any case fans to the motherboard or the power supply (less desirable).
Close the cover on the case.
That is it. Nine parts. I put one together recently in under ten minutes in front of a group while talking about putting one together. I had rehearsed doing it several times and used a completely tool-less case. On a first try don't be surprised if it takes up to five hours as you refer back to manuals. Take your time. But it is a thrill when you fire it up for the first time.
Clearly you are still not done. You have a box. A less mysterious box. But now you need to plug a few peripheral devices to make the PC. A monitor, a keyboard, a mouse, speakers are highly recommended. Plug a cord into the PSU and then into a powered outlet. Turn on the PSU switch if any. Turn on the monitor, speakers and then push the power button on the front of the PC. Hopefully it springs to life. Since there is no operating system yet you should see a BIOS or its replacement UEFI menu pop up on the monitor. You can explore it or load the OS of choice into the optical drive and put an OS onto your hard drive or SSD.
You may want an optional video expansion card if you do serious video rendering, graphics, CAD drawing or 3D gaming. Be sure to bump up the watts delivered by the PSU to whatever the graphics card maker recommends.
It is possible to have other expansion cards but most functions are now built into the motherboard.
Operating System: There are quite a few operating systems (OS) out there but the vast majority are Windows OS and most are either XP, Vista or Windows 7. At this point I would only recommend 64-bit OS of either Windows 7 or Linux. 64-bit is definitely not just the future it is the present. Windows 7 is a very good OS. So is Linux. Linux allows you to try it out before installing it as a Live CD. Linux is also free. Windows will set u back at least a hundred bucks.
If you are planing on reusing a printer be aware that many old printers do not have a 64-bit driver and are dead ends. If a 64-bit Vista driver exists it likely will work with Windows 7. Otherwise time to buy a new printer. All-In-Ones are popular---printer, scanner, copy and fax in one machine.
If you camera uses an SD card or other flash drive it is nice to either buy a case with a built in reader, add one or buy an external to plug into a USB port.
And I think that is it. Slapping nine components together will build you a PC (box). Adding the necessary peripherals. Adding some useful peripherals. And careful decisions on selecting parts for compatibility, reliability and capability to do the things you need will give you a PC that will last for years. And assembling it yourself will give you confidence in you ability to clean, maintain, repair and upgrade the PC as needed. A good skill set to have in trying times. A good skill set to have for an activist.